Pages

Thursday, May 31, 2012

Wheat Harvest 2012

Since we got some rain last night the wheat harvest was put on hold for a day or so, giving me a chance to catch you up on how it's going.

Well, this spring has been a busy one. After getting the corn planted we went strait into vaccinating all the cattle, build some new fences in some of the pastures and baling some lots of hay! In the span of about 2 weeks we probably baled about 1,800 large round bales of hay. And on top of all that the wheat got ready to harvest about two weeks earlier than normal, because of the warmer than normal temps we had this spring. So needless to say, there has been no slowing around here.

Well harvest got started last Friday afternoon. The combines pulled into the field and we started cutting, stopped on Sunday and then have gone strong all this week until today since we got about an inch of rain over night and it's all a little too wet to go. Thanks to the warmer than normal spring temps, the harvest is about two weeks or so earlier than normal, so even though the combines weren't going today the guys were still busy out there getting hay hauled and getting everything ready to start planting soybeans after the wheat is harvested.

I have been busy here in the house too, trying to sort through all of Chester's clothes and figure out what fits and what we will be wearing over the summer....

It's a never ending process!!

Ok, back to wheat...


We have been looking forward to this years harvest for a while now, cause it has been looking so good.


I took this a few days before the wheat got ready. By the time we were harvesting the wheat the bales were all gone and replaced by cattle.


There is a special scientific way to tell if the wheat is ready to harvest.

Take a head of it,

Shell it,

And pop it into your mouth and chew it.

Basically if it's crunchy it's ready.


Caleb and Pop were discussing if the wheat was "crunchy" enough...

And it was cause just a couple hours later they pulled in and they were off!

In all honesty they can tell a lot by chewing it. But after the cut some I head to the grain elevator to have the moisture tested. If the wheat isn't dried down enough you will get docked so much money off what you sell it for. Also if there is to much moisture in the grain when storing it, then the grain can spoil and will be no good.


In these pics Caleb was down digging in the soil to see if there was enough moisture to start planting beans. And there was, but there wasn't anyone to run the planter so it's gonna have to wait.


If he knows I'm taking his picture I will usually get a big smile from him.


If we have the man power we will usually have the combines unload on the go. You wouldn't believe how much time it saves during harvest.


And sometimes you can only get to one side of the truck so the will just do a chain unload.


So when we pulled into this field Calvin was stopped with the hopper fully loaded and instead of just pulling under the auger Caleb made the combine move to where he was going with the grain cart and when Calvin had to stop again to unload the wheat went spilling over the top. So Caleb climbed on top and they started pushing as much as they could back into the header so they could save it.


FYI: It's a lot easier to squat down and get these pictures when your not pregnant.


But when you are down there getting those pictures make sure the wind is blowing the right direction, cause if it's not you will have all this everywhere and boy is it itchy!!


So as of right now I think we are somewhere close to being about half done with wheat harvest and so far it's been going GREAT!! We are averaging somewhere around 70 bushels / acre on most of the fields. We have a few fields that we pastured cattle on that will probably only average about 40-50 bushels / acre, but in normal years 40-50 bushels is great in this part of the country, so there's no complaints here!

Alright, I need to get back to doin' some stuff around the house before my little man wakes back up.

Later,

JP

Tuesday, May 29, 2012

The Winner and Some Answers

Congratulations to LeAnna over at "Thoughts and Whatnots" she is the winner of the soap pump and Tumbler. If you haven't checked out her blog, then you should, cause it's wonderful!!! I will try and get those out to you sometime this week.

Also I thought I would take this time to answer some questions I have gotten about making these projects.

Straws - Where did the come from? Well I got mine one amazon. I don't get the chance to go and do much shopping and there really aren't that many stores around here in the middle of no where (I'm not complaining, cause I love living in the middle of no where!) So I googled them and had a really hard time finding them, but I did finally come up with some on amazon. I kinda thought you might be able to find some at Bed, Bath and Beyond or another store like that. One of my friends was gonna check out Target, but I haven't heard if she had any luck.

Grommets - once again I googled them and ended up finding them on Amazon. When searching I typed in "Rubber Grommet 3/8 BD or Bore Diameter (I can't remember which it typed)

Hope this answered some of your Questions. Thanks for Playing!

Janet

Monday, May 21, 2012

GIVEAWAY TIME - Mason Jar Soap Pump and Tumbler

So if you have seen my last two post, then you will have know that I showed you how to make two different project with mason jars...

A Soap Dispenser and A Mason Jar Tumbler Lid.

Now one lucky person will get to win one of each!

the winner will get...

One Soap Dispenser Lid and a pint size jar...


And one Tumbler lid, one straw, and one pint size jar.

Straw will be your choice of color - Pink, Blue, Green, or Orange and either Dots or Stripes.

If you have your own jars and would rather use them, please let me know cause that will make shipping a lot easier!

Rules:

Just leave me a comment telling me what your favorite summer drink is?

One entry per person

*You can earn a second entry by blogging about my giveaway and then leaving a second comment with a link to you post.
* You can even get a third / fourth entry by sharing this contest with your friends via Facebook or Twitter! Be sure to share the link, then come back and let me know you did with another comment.

Entries will close at midnight on Friday, May 25th, 2012 and I will announce the winner on Monday morning.

Good Luck!

JP

Friday, May 18, 2012

DIY - Making a Mason Jar Tumbler Lid

So a while back I was on Etsy (another site that may just be evil, but I love it!) and on the home page they were spotlighting a store that was making these...


Mason Jar Tumblers...

I fell in LOVE with them then and there!!

Hers had plain lids, as do most of mine, but I had a fun lid and ring set that I though just looked soo cute!

So how to make these darling little drink holders, well they are even easier than the Soap Dispenser I showed you the other day.

So here we go...


Tools: Drill with a 7/16 drill bit and tin snips


Supplies: Pint or Quart Mason Jar, a Mason Jar lid and Ring, a Polycarbonate Drinking Straw, and a Rubber Grommet. (I will talk more about what that is in a little bit)


Start with screwing the lid on the jar and then drilling a hole through the top.

Once again make sure to have a hand holding the jar while you are doing this.

Also, I did this in an old ice cream bucket because it would catch all the little metal shavings that were made when you drilled through the lid.


See all those little shavings, you don't want them flying around your house if they don't have to.


Also if you have any little pieces still hanging on you will want to take your tin snips and clip it off.


Next you will need this little guy.

This took me a while to figure out what it was, when I saw it on the one for sale on Etsy.

Well this is a...


Grommet.

WHAT?!?!?!

It's something that is used in auto mechanics. That's all I know about them and that's probably all you care to know about them.

This is important if you are going to make this you need to make sure you get the right size, or it wont work for the straw to go through.

You will need a grommet with a 3/8 Bore Diameter (BD) or Inside Diameter (ID) (that's the middle where the straw will go through)  The straws have a diameter of 3/8 and fit perfectly in there once they have been installed.


Once you have those little guys, you will just take them and carefully push them in to place. Be careful with this, because you don't want to cut yourself on the hole...it's very sharp!


Now wash everything up and make sure all the shavings are out of the jar, then fill the jar with your favorite drink, screw the lid on, put the straw in and sit back and enjoy!

That's an order!! :)


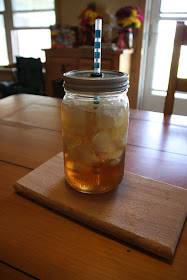
This is my big iced coffee drinking jar, that is currently filled with sweet tea, but whatever.

FYI: if you use the quart jars for the glass, the y don't fit in cup holders in your car....grrrr!

So stay tuned, the beginning of next week I will be doing a give away with both of these DIY projects!

Have a wonderful weekend, I know I will. Little man and I are heading to MO to go and watch my oldest nephew graduate from high school (tear). I think this means I'm getting old! :)

Janet.

Thursday, May 17, 2012

DIY - Making a Mason Jar Soap Pump

So a while back on Pinterest, (I'm pretty sure it's the devil, but I love it...lol) I ran across sever great ideas of things to do with mason jars.  One of them that I loved was a soap dispenser. So I thought I would give it a whirl. and it's super easy, so I though I would share how to do it with all of you in case you would like to make your very own.

So here we go....


Tools needed: A drill, with a 1/2 inch drill bit (the 1/2 inch was missing so I had to use the 7/16 and improvise), tin snips, and a box blade. 


Supplies you need: Pint size mason jar, mason jar lid and ring, and a soap pump.

I found the soap dispenser replacement pump at Lowes. I think it cost me about $1.50 - 1.75. I know I'm a big spender. lol

Oh and the jar lid I used was actually one that I had canned with and took off a jar. I washed it up and am re-using it...

I love being able to get all the good I possibly can out of an item!


Ok screw the lid an ring on the jar and drill a hole in the middle...

or as close to the middle as you can...

of the jar.

You will need to have hand holding on to the jar, when drilling through the lid.

I put the jar in an old ice cream bucket to catch all the metal shavings.


See there were lots of metal shavings.


Now you may or may not have a little piece of metal that is still hangin' on if so, then...


Take your tin snips and cut it off.  Like I said I didn't have a big enough drill bit, so I also used the snips to make the hole just a little bigger.


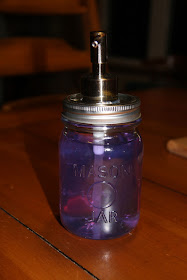
Now stick the pump through the hole in the lid and there you have it.


Now as you can see the straw that will stick down in the soap is a little long so it will need to be trimmed up.


I used a box blade to trim this one, but you might be able to use a pair of scissors.


Once you get it the right length put the ring over the lid and place on jar. I also took some hot glue and went around the pump to make it a little more solid, but I really don't think you need to do this.


Now add your favorite soap to it and enjoy.

I have another fun Mason Jar DIY that I will hopefully get to share here in a day or two.

JP